Bank Reconciliation Import and Co-Pilot AI
Concept
- This document addresses two points to help with Bank Reconciliations. You can just do the file mapping by itself and not use Artificial Intelligence (AI) if you like. However, if you want to use AI, then you must have a file to import.
- The bank reconciliation in Business Central works best when you import records from the bank account. Unfortunately, setting up the fully integrated import routines is not completely reliable and costs hours and potentially monthly fees to setup. To get around this we are providing a semi-automatic process. This process involves exporting a simple text file from the bank website and formatting an import into Business Central.
- The matching of imported records works best when used in conjunction with the built-in Artificial Intelligence module “Co-Pilot”.
Turn on the Artificial Intelligence Settings (Optional)
You must be running BC23 or later to use this feature.
Turn on Co-Pilot.
Search "Copilot & AI Capabilities" to ensure your Bank Account Reconciliation "Capability" is turned on, data flow is enabled, etc.
Turn on the “Bank account reconciliation with Copilot” feature in Feature Management.
- Search "Feature Management" then find the line: "Feature Preview: Bank account reconciliation with Copilot" (if not visible, it is turned on by default in your Business Central version)
- Ensure the feature is set to Enabled for "All Users"
- You may have to log off and log back in to fully enable.
- Search "Feature Management" then find the line: "Feature Preview: Bank account reconciliation with Copilot" (if not visible, it is turned on by default in your Business Central version)
Setup the Import of the Bank Statement File
The solution we are proposing is a semi-automatic process:
- Because a human must log into the bank website to export the simple text file, we avoid all the complexities of having one system talk to another.
- Because we take the exported file and run it through a (graphical) mapping tool that takes just a few minutes to setup; if there are changes in future exports; we can just re-map the process.
- If you want a fully automated process, please contact your HomeBuilder consultant, or turn on a service like the “Envestnet Yodlee - Bank Feeds Service”.
Steps:
Export a File from your Bank.
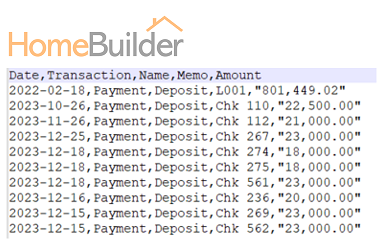
- Most banking websites provide one or more export types. Once you have logged into your bank account, find a CSV or .txt export if possible. You want the export to be a flat file.
- Here is a sample layout:
Map the Export in Business Central Using the Assisted Setup Wizard.
- Search Assisted Setup to open the “Assisted Setup” page in Business Central.
- Find the line “Set up a bank statement file import format”, click on the line (the Hyperlink), and follow the instructions.

On page 1 of the Wizard (called "Bank Statement File Setup) click Next
Page 2 – Upload a sample file and allow the system to help define the layout.
- Using a file from your bank to get the system to define the layout is significantly easier than building the layout yourself.
- You can override the process manually if you prefer but the automated system works well.
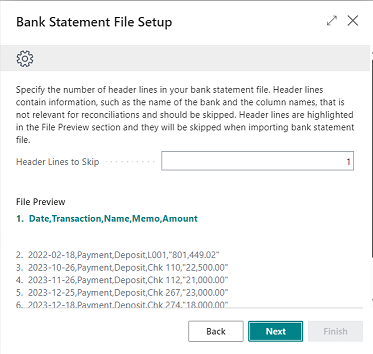
Page 3 – confirm the suggested number of header lines the import should ignore, one in our example:
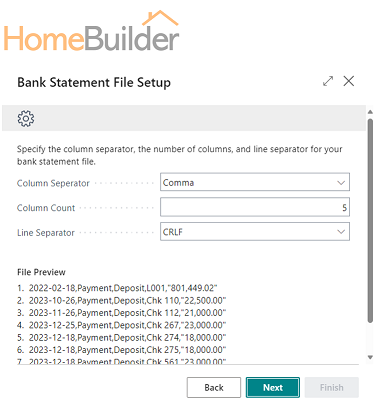
- Page 4 – Confirm the suggested separator, number of columns, and line separator. The settings shown below worked for our example file.
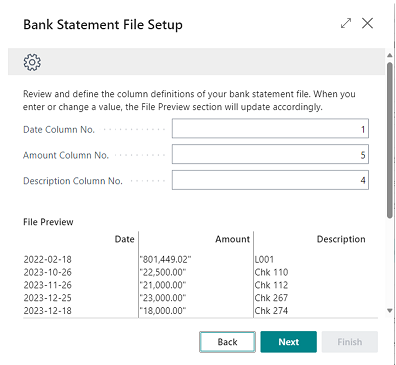
- Page 5 – Confirm/tell the import which column is which:
Page 6 – Confirm/Tell the import the date format and decimal separator:
Page 7 – Click on the Test link to see the Bank Statement Import preview.
- Ensure that the headers are aligned with the content (E.g. Transaction Amount header contains a payment number from your Bank Statement)
- If the Headers are misalligned with the content, go back and read the instructional carefully to see the misconfiguration reason.
Page 8 – Give your definition a name and attach it to a specific Bank Account that you work with.
- You should pick something that will explain to various users the content of the file. There is no specific "format" required here.
Running the Bank Reconciliation
- Create a new Bank Reconciliation as normal. However, instead of running the “Suggest Lines” routine, click on “Reconcile with Copilot” from the List (note that you may not be able to run this from the card).

Note
If you did not turn on the Artificial Intelligence tools, you can bring in the file from the Bank Tab with the button “Import Bank Statement”.
- Click on the “Import transaction data” link and select the file you exported from the bank.

- Click on the Generate button after selecting the data file from the bank.
- You will get a screen reporting on what the system matched; in my case, all lines were matched even though some transactions were out of my typical date tolerance.
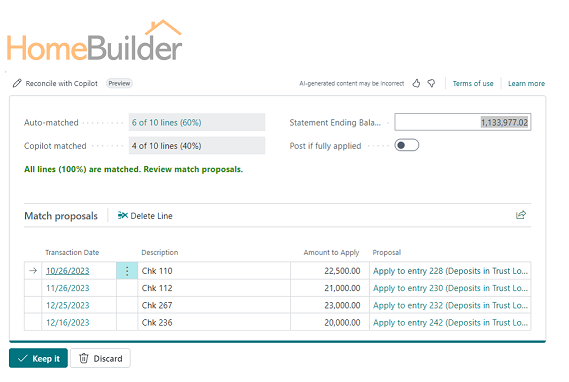
- Review the Bank Reconciliation.
- Make manual adjustments if necessary.
- Once satisfied with the results, post the Bank Rec.
Note
You can view your setup in “Data Exchange Definitions”. This is a more advanced part of the system and is not recommended for most users. If your file is not working, it is normally easiest to just rebuild by starting the Assisted Setup Wizard.
Solving for dates errors and making the Amount show credit debit based upon another field for co-pilot bank import.
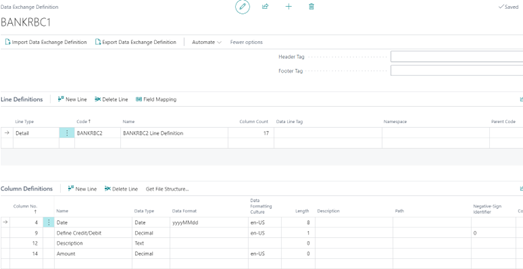
- If you get an error that the date format is not correct or is missing, you may want to use the following two settings (see image below called “Data Exchange Definition”).
- Date Format = yyyyMMdd
- Length = 8
- B Another Date format is M/d/yyyy rather than M/dd/yyy
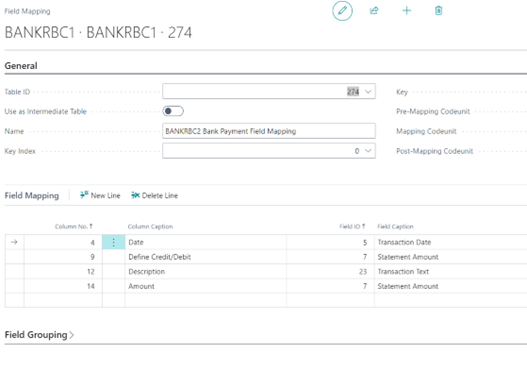
- If all Amounts are positive from the export out of the bank, they will normally provide another field that indicates whether the Amount is a Credit or a Debit. In our example, field “9” is “0” for credits and “1” for debits. Therefore, we must reverse the Amount sign for credits. (see image below called “Field Mapping”). This is done by:
- Start in the "Data Exchange Definition" page, scroll down and expand the "Column Definitions Fasttab".
- Create a new Column Definition record. See below for field contents that require an entry:
- Column No. = “9”
- Name = "Define Credit/Debit"
- Data Type = Use Decimal if a number e.g. 0 or 1, use Text if letters e.g. C or D.
- Data Formatting Culture = e.g. "en-US". Generally only required for importing and exporting Data Exchange Definitions between companies
- Length = 1 (for our example of a 1 or a 0)
- “Negative Sign Indicator” field = e.g. "0" for the example shown but could be "C" if a letter denotes to switch the sign.
- Now go back to the Data Exchange Definition page and click on the button called “Field Mapping”
- Create a new Field Mapping record to the subtable. See below for field contents that require an entry:
- Column No. = “9” (from our example)
- Field ID = "7". Note that you should now have two records pointing to the field 7 (Statement Amount). One to pull in the amount and now this new one defining when the field becomes a negative amount.
Tip
Just a friendly few hints to complete the whole process
- Positive numbers are deposits to the bank, negative numbers are payments from the bank.
- There are useful Import/Export routines right in the Data Exchange Definitions page, use them to copy to other companies.
- In addition to importing the Data Exchange Definition, you also need to create a record in the Page "Bank Export/Import Setup (1200, List)" from table 1200, The Direction is Import and the Processing Codeunit ID is 1270.
- You need to reference this newly created Bank Import to the Bank in the "Transfer" Fasttab in the field "Bank Statement Import Format".
Data Exchange Definition
Field Mapping
- Page Bank Export/Import Setup (1200, List) from table 1200
- Data Exch Def List (1211, List) from table 1222

