Construction Item Categories
General Overview
The Item Category on the Item is used to classify the item for filtering and reporting. In HomeBuilder, Item Categories help define the House Areas where the Items of this category can potentially be installed. When an Item Category is assigned to an Item, the applicable House Areas will be inherited by the Item from the Item Category.
Although this is much less important than the Items themselves, you need to configure Item Categories before you create Items. You can change them later if you need to.
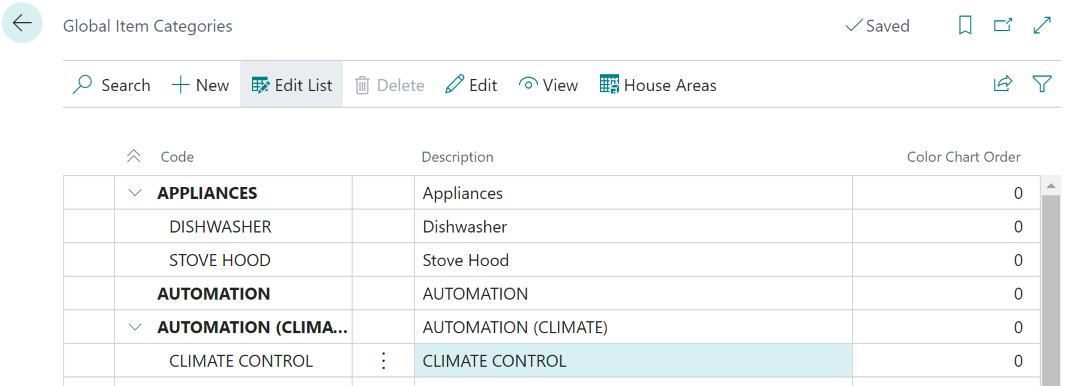
Although not required, you have the option to create a hierarchy with Item Categories. The "super-category” (in bold in the image below) and the “sub-category" (non-bold). The sub-category inherits House Areas from its super-category.

Construction Item Categories are implemented using the table “Item Category” of Business Central. To access, search Item Categories. This is a local table, i.e., Construction Item Categories are specific for a Company.
To define Construction Item Categories in global scope, open the page "Global Item Categories" by searching it or by navigating to a Roles Center (i.e. Homebuilder- Catalogues - Global Item Categories).
Item Category Functions
The Item Category, which is entered on the Construction Item performs the following functions:
- Pre-determining the House Area on the Construction Item. It copies the House Areas from the Construction Item Category (just to save a little extra keying).
- Determining the number of lines per House Area you will provide the person processing Color Chart Selection.
- Classifying Construction Items to be able to group them by function.
- Filtering lists, most commonly:
- Construction Items.
- Lot Planning Lines.
- Any other table where Construction Items were used to create the information.
- Reporting in summary format.
Construction Items are the main thing that you will work with however it is best to create Construction Item Categories before you setup Construction Items. You can always change them later if you need to.
Examples of Item Category:
Appliances - Dishwasher
Appliances - Stove
Appliances - Stove Hood
Appliances - Fridge
Bathtub
Drain and Water
Sink
Item Categories - Parent-Child relationships
Tip
Microsoft provides the option to create a hierarchy with Construction Item Categories and this is available through the HomeBuilder app. This is not required and has been reported to be less useful than might first be thought with home builders.
The example provided shows Item Categories with no hierarchy, however, the demo database has examples with the hierarchy in place.
The "super-category” (bold) and the “sub-category" (non-bold). The sub-category inherits House Areas from its super-category.
The way to create an Item Category as a Super-Category is just to create the Item Category.
To create a sub-category Item Category, fill in the field "Parent Category" from within the card and the system will automatically change the indentation structure.
Lot Selection Packages (Color Chart) and Item Categories
Other than assisting with filtering; the Item Category is an important factor for Color Chart Selection. You can only have one default line per Item Category per House Area.
In the sample data (above) you will see that there is a category for Bathtubs and another for Sinks. This is just in order to have individual selections for the Color Chart selection.
Note that you can add more Item Categories (on the fly) when you are performing a Color Chart selection, it is just the default that is restricted.
House Areas and Item Categories
In HomeBuilder, Item Categories help to define the House Areas where the Construction Items of this category can be potentially installed.
When an Item Category is assigned to an Item, the applicable House Areas will be inherited by the Item from the Item Category; they can be changed after inheriting the initial selection.
Item Category House Areas Page
To access, search Global Item Categories, then select the House Areas button.
Page "Item Category House Areas" allows a user to define the House Areas that may be applicable to the Items of the Item Category.
The page has one action – "Add House Areas"
- This action allows a user to add House Areas to the Item Category from the list of House Areas.
- Select House Areas you would like to add to the Item Category and press "Add House Areas to Item Category".
Technical Notes Regarding Item Category House Areas Management
Deletion of a House Area is possible only if the combination of Item Category / House Area does not exist in Planning Lines or in Lot Selection Choices of Lot Selection Packages which are closed. On deletion of a House Area from an Item Category, the system does the following:
- Delete the House Area from the sub-categories.
- Delete the House Area, from the Items of the Item Category or its sub-categories.
- Delete Model Item House Areas with the House Area and with the Items of the Item Category or its sub-categories.
- Delete Color Selections with the House Area and the Item Category or its sub-categories.
- Delete Lot Selection Choices with the House Area and the Item Category or its sub-categories from open Lot Selection Packages.
On adding a House Area to an Item Category, the system does the following:
- Add the House Area to the sub-categories of the Item Category.
- Add the House Area to the Items of the Item Category or its sub-categories.
Item Categories - the Recalculate Function
On the Item Category list, there is a button "Recalculate". This button scans the list of Item Categories and updates all Items and Model Items with the House Areas that are currently setup in Item Categories.
Note that the system will ask for confirmation of each change which can take many clicks if there are many changes.
